Nuke Quicktip: Rebuilding CG and Grading AOVs

A CG Render is made up of AOVs (Arbitrary Output Variables) or otherwise called Render Passes. These are used to have more control when compositing and are highly recommended to achieve photorealistic integrations with live-action.
Today we are going to talk about rebuilding CG and Grading AOVs.

We call “Beauty” the rendered RGB image that comes straight from 3D. When expanded, we break down the Beauty into separate images/render passes/AOVs.

Before Rebuilding CG for grading, we must ask ourselves if it is absolutely necessary to rebuild it. If we are changing minor things, we can use the subtractive method of grading AOVs.

Most of the time 3D artists have spent hours on shading and lighting. Major changes should not be necessary in comp.

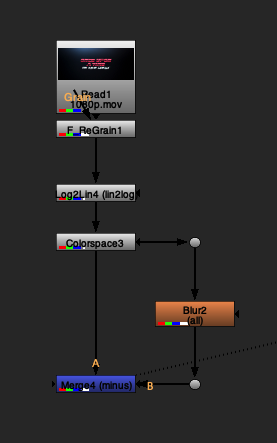
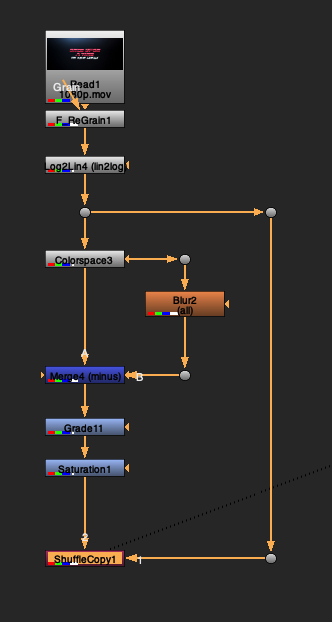
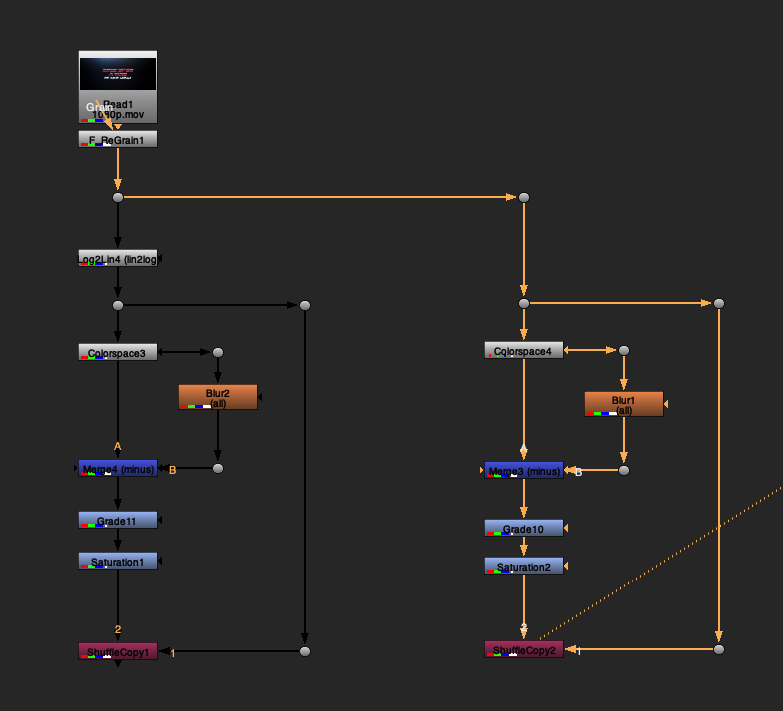
We will start with a full traditional additive CG rebuild.
This consists in separating the render into passes and re-assembling them together to match the original beauty. We would then tweak these passes separately, aiming for a more accurate or photoreal composite.
(in Nuke we separate the passes from the beauty by selecting it and clicking E for “expand”).

Rebuilding CG and Grading AOVs with Additive Method

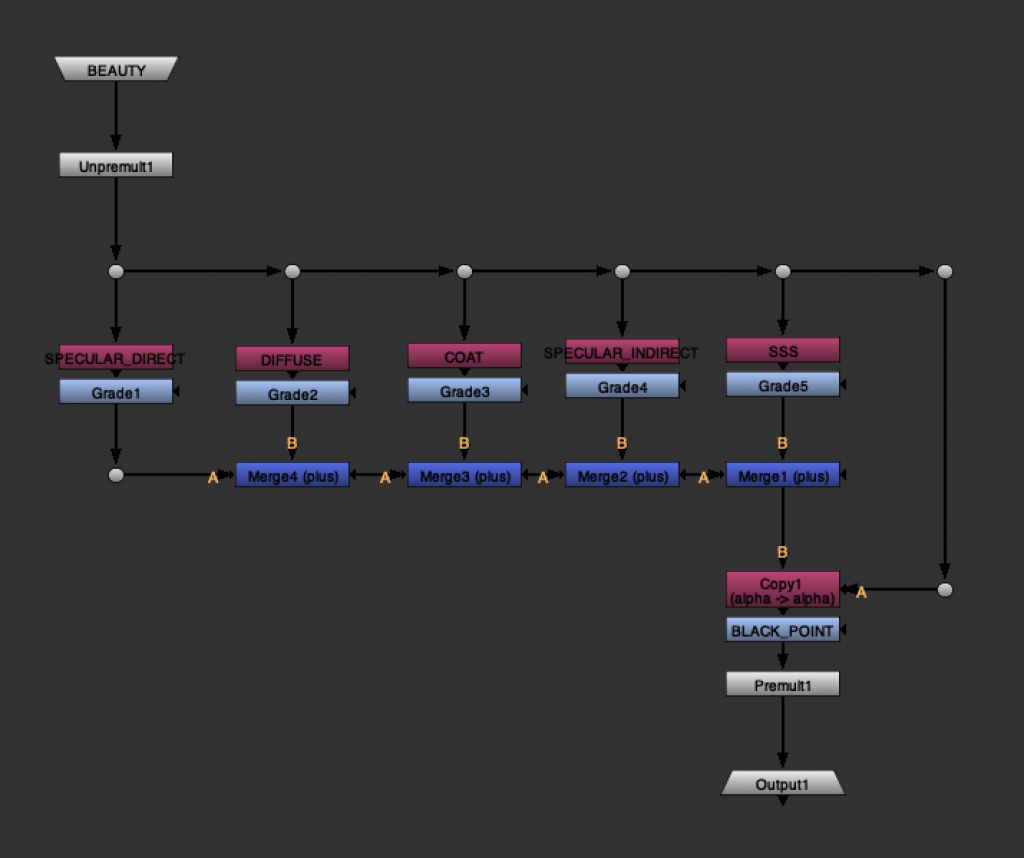
This is what a barebones CG rebuild would look like. Do not forget to copy back the original alpha into the stream before premultiplying, and check if the beauty and the premultiplied output match before doing any grading.

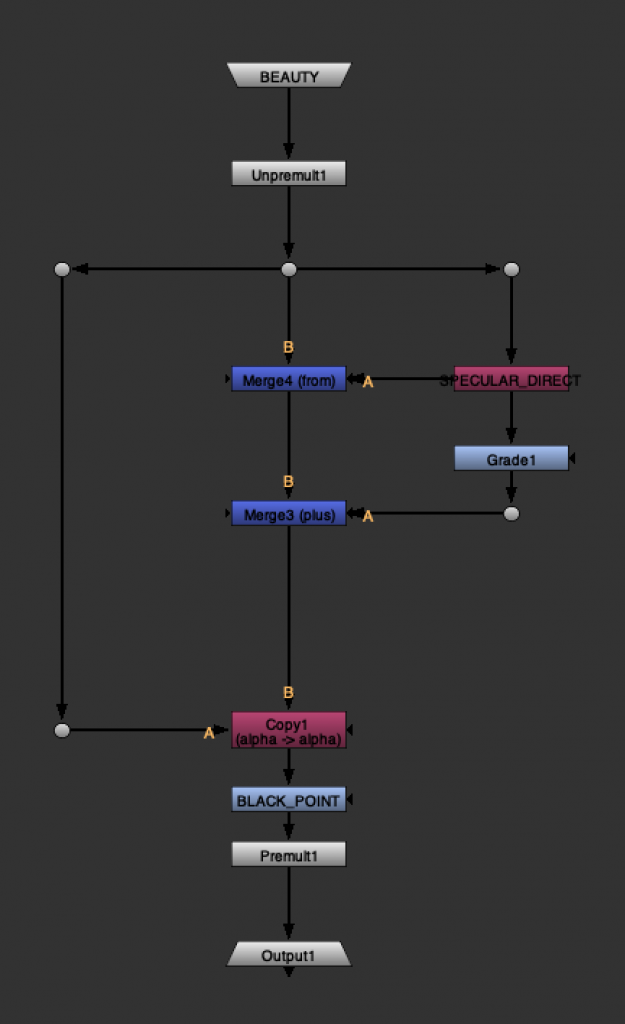
In most cases, a full additive rebuild can be quite over the top. This is where the subtractive method shines because it does not involve rebuilding the render. It involves separating a pass out of the main pipe with a “from” operation, grading it, and “plus”-ing it back.

Rebuilding CG and Grading AOVs with Subtractive Method

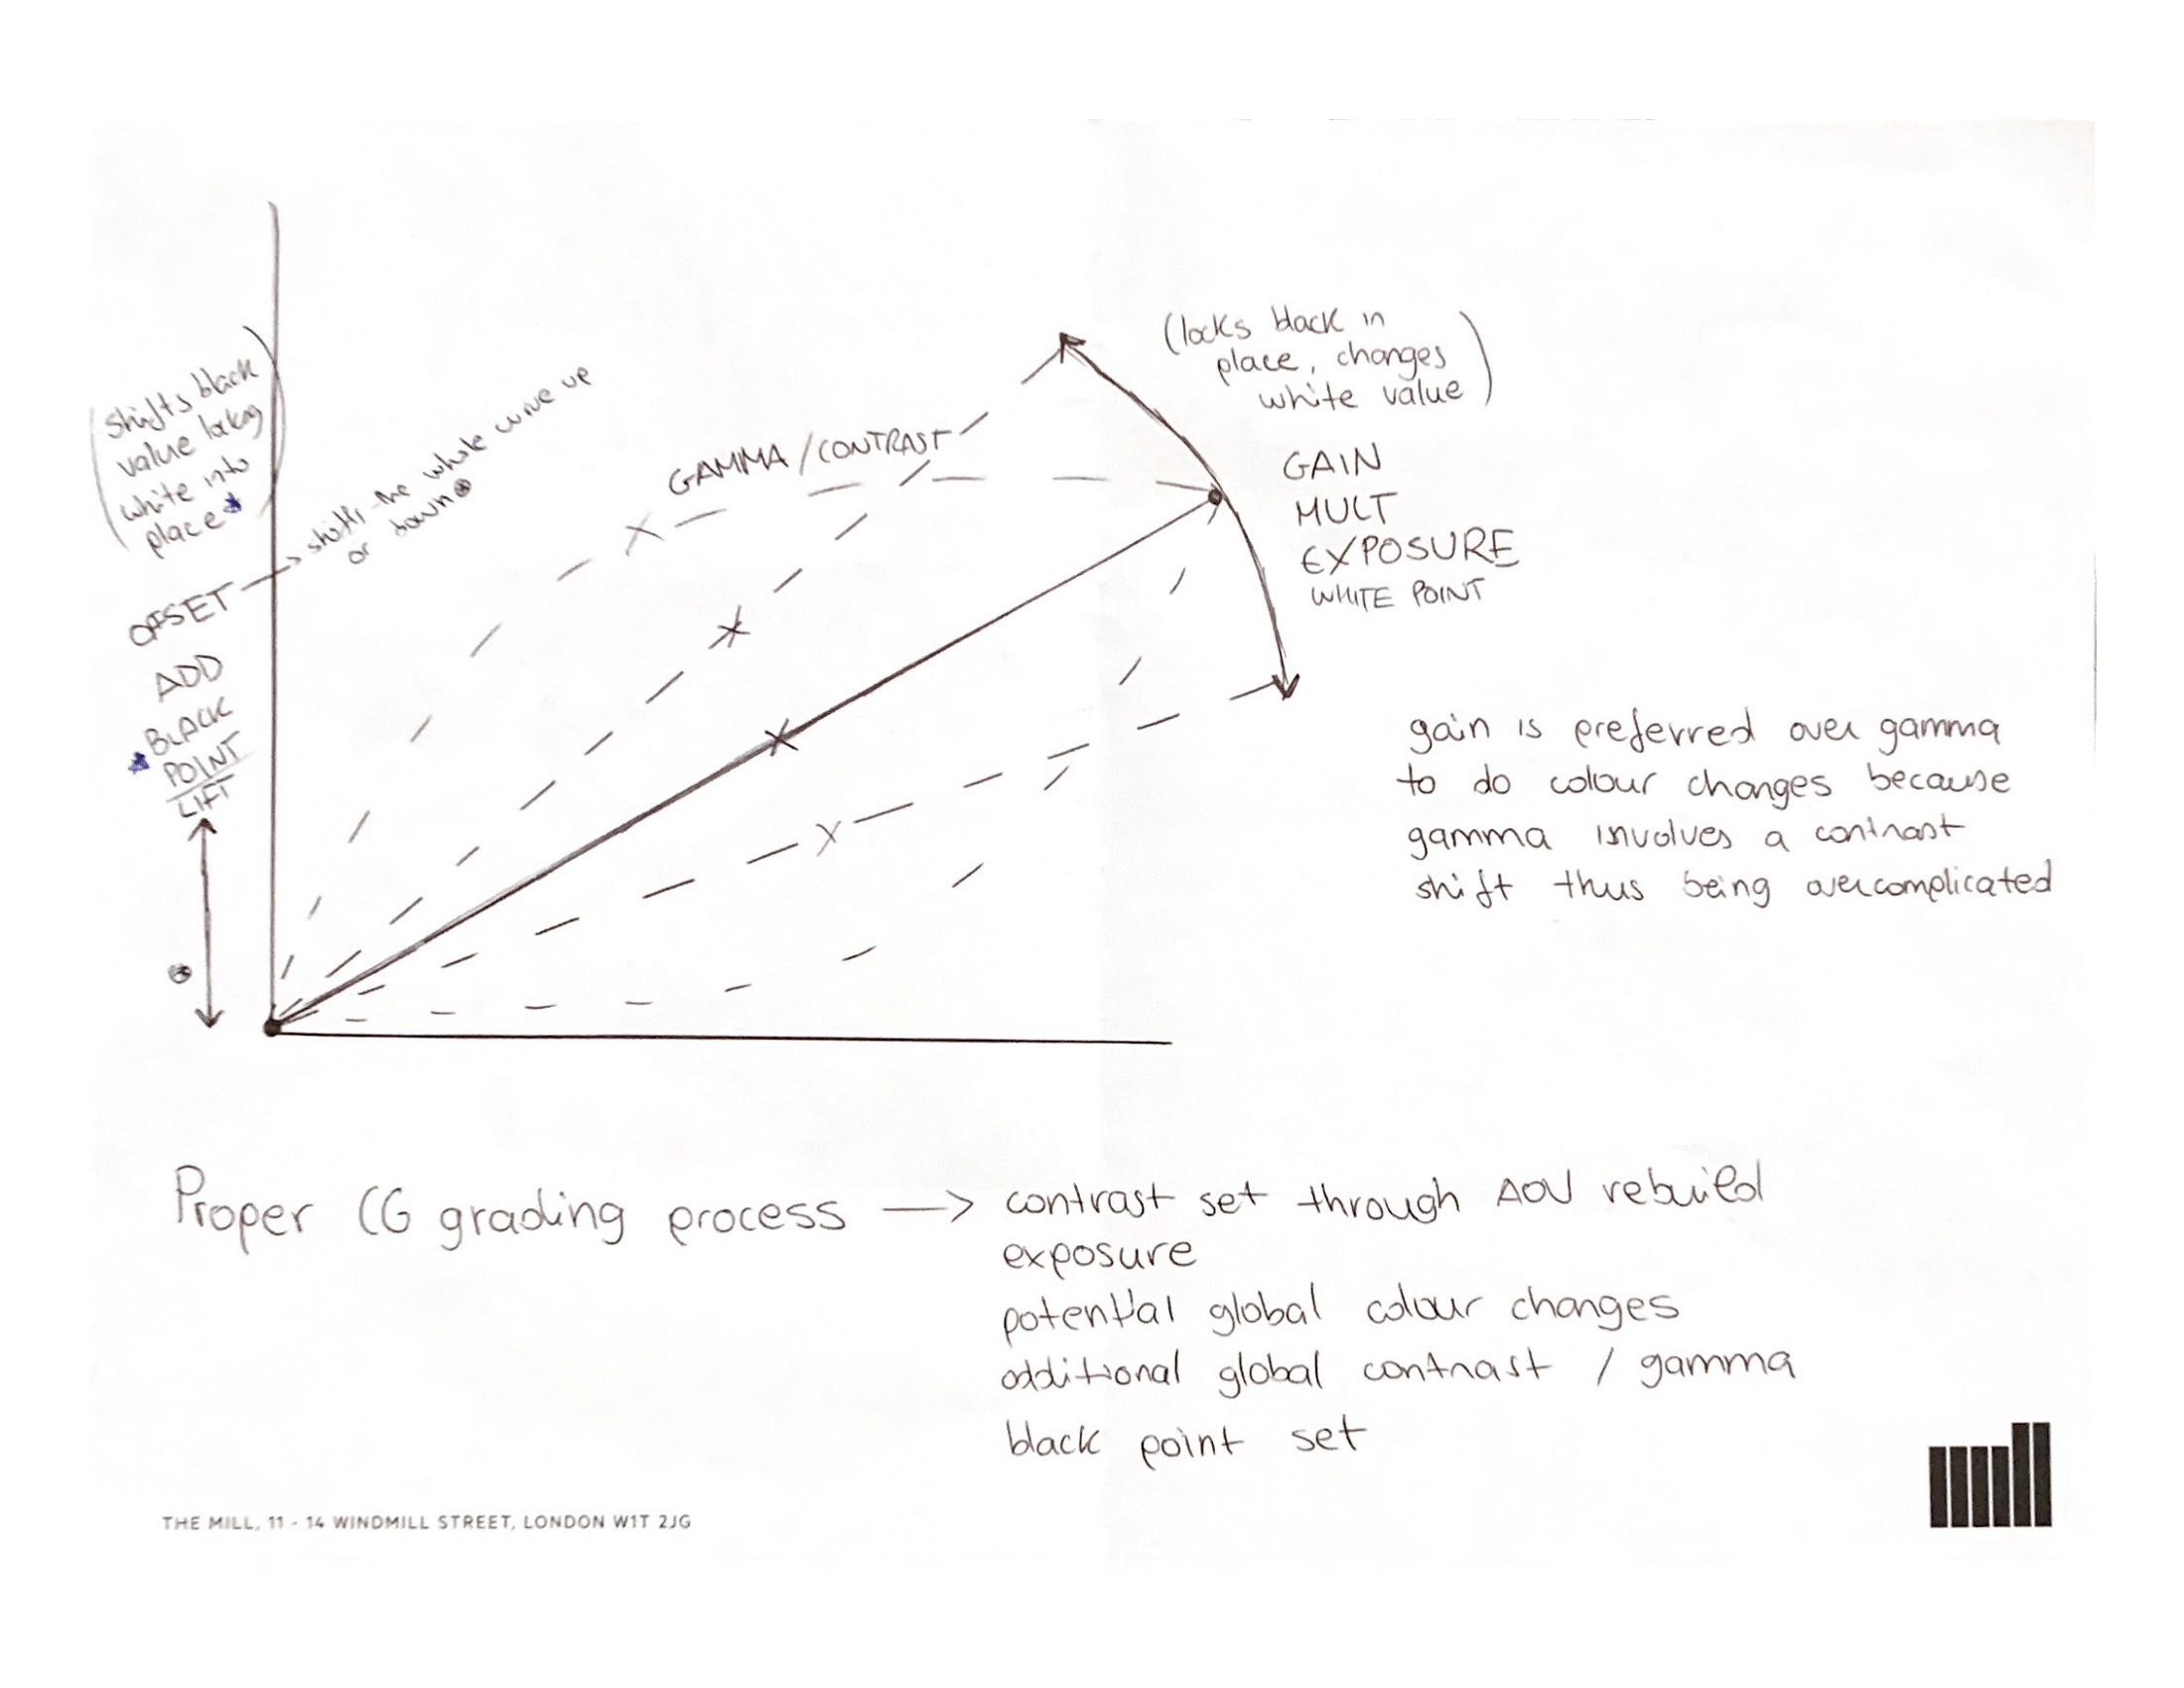
On the topic of grading, I’ll also cover an often-overlooked topic. What do lift, gamma, gain, multiply, offset etc. actually do and which you should use depending on your goal.

In this drawing, I explain what each operation does relating to a value curve and how you shoud use it correctly.

Grading AOVs Explained

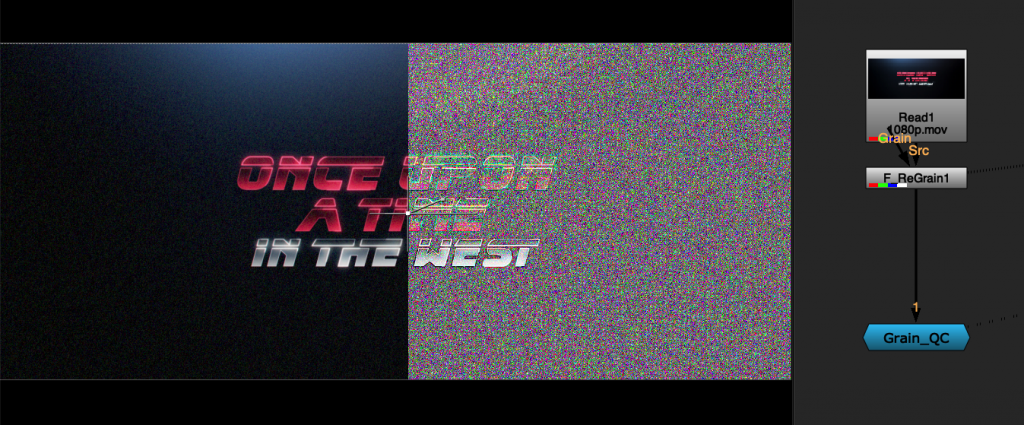
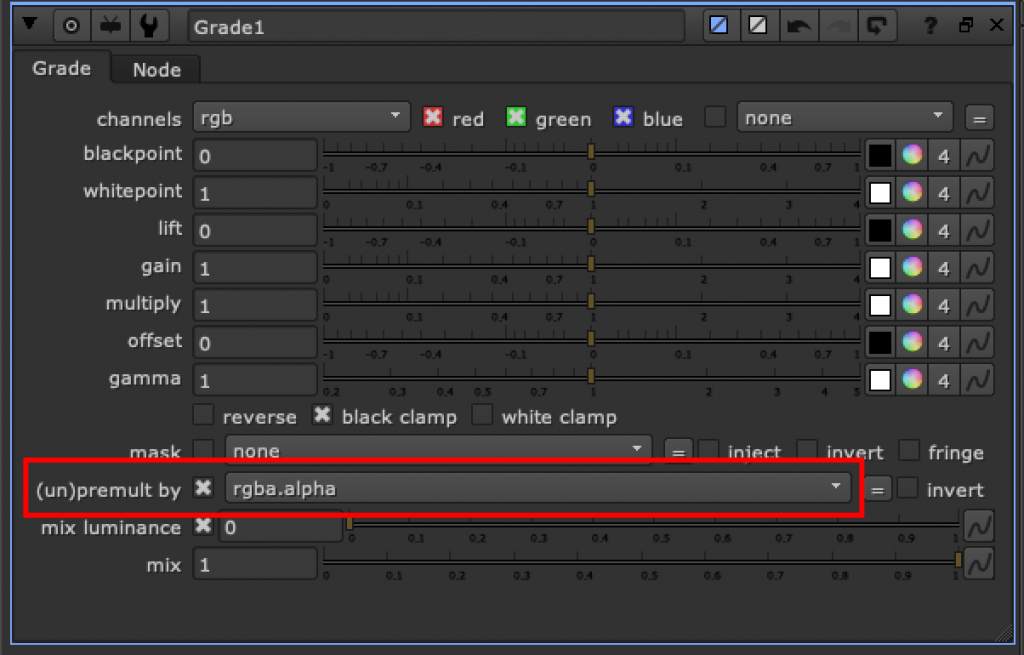
One last tip relating to grading. If you grade a premultiplied input make sure to tick the “(un)premultiply by alpha” to cover until the edge. If you don’t you’ll end up with non graded semi-transparent edges.

Grading AOVs Unpremultiply

That’s all from this quick tip. Now stop reading and start properly rebuilding and grading all the CG renders you want!

If you enjoyed reading this post about Rebuilding CG and Grading AOVs why not check out my other blog posts

visionary music group logic GIF

Credit
Tom Luff
VFX Supervisor

Nuke Quicktip: Building a GrainQC node

Arguably, one of the most important tasks as a compositor is to match grain. This is not a one-step process, you need to apply and adjust grain carefully and precisely. To match it though, you need to be able to see it.
In this quicktip, we are building a GrainQC node in Nuke that you can use to check grain accuracy. Let’s Start!

get started video games GIF

In a new Nuke Comp add a ”Log2Lin” node to convert the workspace from linear to logarithmic. This because log retains the most dynamic range of information by encoding what the camera sees logarithmically.

Building a GrainQC node colourspace transform

Now we need to sample the grain in dark areas. We do this by changing the colourspace to Cineon and blurring the RGB in a separate pipe minusing it under A. We can substitute this process simply with a ‘laplacian” node.

To make the grain more visible, we increase the gain as well as the saturation. In this case respectively to 100 and by 3.

The last step for this section is to copy the original alpha into our current pipe.

Building a GrainQC node grading

We can now duplicate this section, removing the ”Log2Lin” node and increasing the gain to 500. We will use this pipe to sample the grain in bright areas.

Building a GrainQC node bright areas

To recap, the left section is sampling grain in dark areas and the right section is sampling in bright areas. This is pivital when building a GrainQC node since we want to see grain patterns in all areas of the scan.
We can now max both pipes together and plus the output over the original input.

Building a GrainQC node dark and bright area merged

This is what the full script should look like. Our gizmo is nearly done!

The last step is to group these nodes by pressing (Ctrl+G / Cmd+G) and setting the last node as the group’s output (in this case the merge “plus” node).

Building a GrainQC node test footage

This is the final result! Now we have a GrainQC node that we can save in a text document for safekeeping or add to our Nuke toolset.

Check out my blogpost where I teach you an effective regrain setup for your scans in Nuke.

Similary, if you want a grain checker that works in Nuke Studio, have a look at this tool by the awesome Mads Hagbarth Damsbo.

leaving see ya GIF

Until next time…

Nuke Quicktip: Regrain Setup

A pivital point in compositing CG on a live action scan is grain matching. In this Nuke Quicktip I am going to show you an effective regrain setup using a difference keyer and a nifty expression.

When re-graining something to apply to a live-action plate, a problem I see a lot is doubling up of grain. Mainly caused by applying grain to the whole working area, not just masked by the alpha of what you are merging.

Martin Lawrence No GIF

Another problem comes when grain is applied to a patch with semi-transparent edges. This will double up the grain around the edges of the patch because it has values between 0 and 1.

To avoid encountering these issues when tech checking, use this simple setup to regrain all of your shots.

Regrain Setup Breakdown

The principle of this setup is to apply the patch to the whole denoised plate, making sure it sits properly.
Then copying back the hard edged alpha of the patch through a differecne key.
Finally re-graining it, premultiplying it and merging it over the original scan.

In practice, the setup would look something like this.

Regrain Setup Nuke Script

The difference node takes the difference between the original denoised plate and the patched denoised plate. We use it to create an alpha where the patches exist.

The expression sees if the values in the alpha are bigger than 0.0000001 and rounds them to 1 if not, to 0. This expression is used to achieve a hard edge matte, to avoid semi-transparent areas when re-graining.

If you want to learn how to create a GrainQC node in Nuke check out my other blog post! You will learn how to effectively quality control the grain in your shot. This way you test this new regrain setup on your shots.

Credit
Neil Alford
2D Lead

Raster and Vector : What’s the Difference?

Raster and Vector are the two main categories of digital graphics.

Raster graphics are best used for photographs, scanned artwork or detailed graphics. Since they are pixel-based though they suffer image degradation.
When scaled up, raster images gets rough and jagged/pixelated.

Vector-based graphics are more versatile and easy to use. The most obvious advantage is that they are not resolution-dependent and are perfectly scalable with no image degradation.

raster and vector images

As we already know, the raster format is resolution-specific. Therefore the images display at one specific resolution.
You measure the resolution of raster images in dpi or dots per inch. The higher the dpi, the better the resolution.
Better resolution, however, comes at a price in the form of large file size.

Unlike pixel-based raster images, vector graphics are based on mathematical formulas that define geometric polygonal primitives. Because of this, logos, UI elements, sprites and fonts best represent this format.

If you want to read more about digital graphics check out the post below, which talks about the difference between RGB and CMYK colour models.


If you want to dive deeper check out these Skillshare courses covering the principles of raster graphics in Adobe Photoshop and vector graphics in Adobe Illustrator.

My five year plan in the visual effects industry

My five year plan in the visual effects industry, how exciting!
Now that I have finished college, the next five years will be interesting.

Five years from now I plan to obtain a Ba / Master’s degree in The Art of Visual Effects.

My decision to go to University is mainly due to three reasons: the Connections (since it is situated in London, a hub for film and movies), Experience and a Diploma.

I will be attending Escape Studios, a private university that specialises in Visual Effects.

Being situated in London, the Uni is surrounded by many Visual Effects companies like DoubleNegative, TheMill, Framestore, Analog, Lumiere, JellyfishPictures etc.

My plan will be to apply for a job in these studios as an internship or even a full-fledged job as a Junior Artist. From here I’d hopefully get further up the hierarchy, with a dream of becoming a Senior VFX Compositor and Creative Director.

My all-time dream is to be on the big screen, not as an actor but in the credits. Trust me, it is way more gratifying than it sounds.

In the future, I would like to have financial freedom. A sense of comfort where, no matter what happens I will have the money to take care of it. I don’t need a luxurious lifestyle, as long as I can express myself and be creative I will be happy.

Another goal of mine is to be able to have a family without financial stress and worries. I want to make sure that my children can follow their dreams and grow up with undestranding parents.

With the increasing popularity of task automation at work, many jobs will be decreasingly available to us. Creativity is the one skill that you should invest in because you cannot program a robot to be creative.

I have been working hard in school because I think it is vital for my future. I need proper education to accomplish all of the goals that I have set out for myself.

Regarding how I am going to pay for all of this. I am going to pay off my student loan with monthly contributions from my wages.

Cutting it short, all of these things are a part of my future. University is not my future, it’s only the beginning of it.

If you are seeing this in 2023, click the button below to read my five year plan, five years later!